Sœurs de Luxe

BEAUTY | LIFESTYLE | TRAVEL | FOOD | HOME INTERIORS | PARENTING | BABY

Friday, October 23, 2015

Ad | Cocoa Brown | NEW Tanning Gels for £5.99

cocoa brown gel
source
Now, as we've got mediterannean skin (luckily) we don't usually need to wear fake tan, as we're darker than usual anyway and tan very easily, however, in the winter months, we do feel quite pastey, and that desire, by almost every girl, is to always rock an amazing tan! Cocoa Brown is probably the one brand I've actually used, as I cannot stand the smell of them usually! They just smell like biscuits and BO! I've used the Gentle Bronze Gradual Tan before. It smells okay and isn't at all streaky. It leaves me feeling a lot more confident about going bare legged anywhere and can also be used as a hack for semi permanent contouring! Who knew! But the smell is still kinda noticeable and get a bit sticky, as with any fake tan after a day or two!

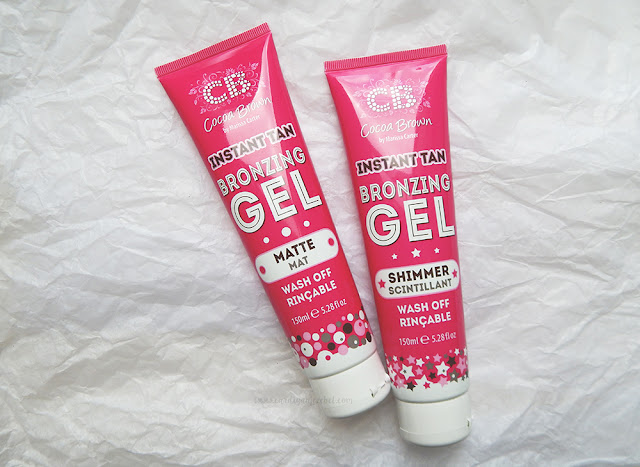
Best Selling Cocoa Brown by Marissa Carter tanning range has just added two new Instant Tan Bronzing Gels to their already extensive tanning range. The highly anticipated Bronzing Gels have been released in both matte and shimmer variants and are available to purchase for £5.99 each.
Like all Cocoa Brown products, the Bronzing Gels are scented with the signature Cocoa Brown Tahitian Gardenia scent - no fake tan pong! As always with Cocoa Brown, the new Instant Tan Bronzing Gels are non-comodengenic meaning they are safe to be used on your face.

What makes the NEW Cocoa Brown by Marissa Carter Instant Tan Bronzing Gels a must-have beauty buy for Autumn 2015?

Instant / Wash off : Great for last minute tanning for special occasions. Rinses off in the shower.
No fake tan pong : Beautifully scented with Cocoa Brown Tahitian Gardenia signature scent.
Two variants : Available in ‘Shimmer’ with light reflecting minerals & ‘Matte’ for that signature bronzed, Cocoa Brown glow.
Lightweight gel formula : Easy, non-sticky application & results will last longer than bronzing powder.
Dries instantly : Apply and get dressed within minutes before heading out!
Facial tanning : Can be layered over your makeup to contour/highlight or used as a foundation replacement for an easy, everyday glow.

Marissa’s Top Tips for applying Cocoa Brown Instant Tan Bronzing Gels :
Use a Cocoa Brown Double Sided Deluxe Pink Velvet Tanning Mitt to apply. Dispense a large coin-sized amount of the Bronzing Gel on the mitt and use soft, circular motions to buff the tan on your skin
Use the Shimmer’ Bronzing Gel to highlight. Apply on cheekbones, down the front of your legs and on your shoulders for an instant radiant complexion.
Add a dash of the ‘Matte’ Bronzing Gel to your foundation for a bronzed makeup look.
Use a contouring makeup brush to apply the Instant Bronzing Gel to contour your face over or instead of makeup.

Let them know what you think ; @CocoaBrownTan #CocoaBrownAW15


Cocoa Brown by Marissa Carter Instant Tan Bronzing Gels, RRP £5.99, are available on www.cloud10beauty.com now.

What are your thoughts on Cocoa Brown's products? Let us know in the comments below!

post signature &  post signature
Share:

Tuesday, October 20, 2015

Wren Family Favourites | Mum's Bolognese

When Wren Kitchens approached me and asked if I wanted to get involved with their #WrenFamilyFavourites campaign, I leapt at the opportunity! I absolutely love cooking (when I'm not too tired after work) and love experimenting with flavours, new recipes and ways of cooking. 
Time after time I keep coming back to the same old recipes. There's something so comforting in eating meals from your childhood. There must be science in there somewhere; how a taste or a smell can trigger memories from your childhood. For me, this meal was a staple on the family menu for years and years, slowly being adapted and improved upon each time. Essentially making it out of what ever we had in the kitchen! I remember making this for my parents when they were too tired after work, and now, the very same meal comforts me and helps me relax after my own exhausting day at work.
My #WrenFamilyFavourite has to be my mum's Spaghetti Bolognese.
Using ingredients you find at the back of the cupboard, the forgotten shelf in the fridge and the lonely vegetables that weren't used for the Sunday roast. To be in fitting with the constant adaption and improvement on the recipe, I have cooked it with Linguine, as for some weird unknown reason my fiancé doesn't like spaghetti.. weird I know! He says its the texture?! You can really use any type of pasta for this!
Here's how to make it for yourself! This should serve 2-3.

Ingredients:
500g 5-12% Fat Lean Beef Mince
1 Onion, diced
2 Cloves of Garlic, crushed
150g Pasta 
4 Rashers of Bacon, fat trimmed, chopped (optional)
2 Tins Chopped Tomatoes
2 Carrots, peeled and chopped
50g Parmesan Cheese, grated
1 tbsp Tomato Puree
1 Beef Stock Cube,
Glass of Red Wine
1/2 tsp Rosemary 
1 tsp Basil
1 tsp Oregano
1-2 Bay Leaves
1 cal Coconut Oil Spray
Salt & Black Pepper


Method:
Get a large, deep saucepan and add 2-3 sprays of Coconut Oil and place on medium heat.
Add the diced onion and fry until browned (option- add bacon).
Reduce heat and add the mince, cook until brown and drain off any excess fat.
Add the carrots and garlic, stirring for 2 minutes.
Add the herbs and stock cube and continue to cook for 5 minutes, still stirring occasionally.
When carrots have softened, add the chopped tomatoes, puree and black pepper. Add Chilli if you like it spicy!
(this is where we tend to get creative - we've added ketchup, barbecue sauce and HP sauce to the mix before, and it tasted great!)
Add the wine and bring to the boil.
(If you have lots of time on your hands, take this down to a simmer and cover for an hour or so. The longer it simmers, the better it will taste!)
Bring a medium pan filled with water to the boil, adding a pinch of salt and 1 tsp of oil.
Once boiled, add the pasta, boil for a few minutes, then reduce heat to simmer.
Reduce the Bolognese to a simmer and cover for 10-15 minutes while the pasta cooks.
When the pasta is cooked through, take off the heat and drain.
Serve up the pasta and top with the bolognese.
Add the grated cheese and season with salt and pepper to taste.
Voila!


Have a look at the other #WrenFamilyFavourites blogger recipes!
What's your favourite family recipe? Let us know in the comments!
post signature
Share:

Monday, October 19, 2015

The Great Denby Cake Off | Lemon and Poppyseed Cake | Recipe


I have so much love for this cake and it's just so light and refreshing that you can have it any time of year, at any time of day. Lemon and Poppyseed cake is the staple to any British Afternoon Tea due to it being the most perfect accompaniment to tea!

When I heard about the Great Denby Cake Off, I just had to get involved! So here's my submission.. the perfect cake for an afternoon tea!

So here's how to bake your own!

Ingredients:
50g Poppyseeds
185ml warm milk
220g caster sugar
3 eggs
300g self-raising flour
200g unsalted butter - softened
1 lemon, rind grated, juiced
300g icing sugar


Method:
Preheat oven to 180C and lightly grease your pan of choice.

Combine the milk and poppyseeds in a bowl and set aside for 15 minutes.

Combine the sugar and 185g of the butter until light and fluffy, then mix in the eggs.

Fold in the flour gradually, alternate with the poppyseed and milk mix.

Finally stir in lemon rind and alternate adding the ingredients to an electric mixer.

Beat on high for 5 minutes until the mixture is pale and thick.

Pour into the tin and bake in the oven for 40 minutes or until a skewer comes out clean.

Turn onto a wire rack to cool.

Melt the remaining butter and mix with the icing sugar and lemon juice. 

Beat with an electric beater until smooth, add more icing sugar if you want it to be thicker.

Decorate with icing and fresh fruit to serve.


It's super easy to make and can be made in any shape or size; whether its in a loaf tin or baked in a bigger shallower square tin to make the little beauties, this cake is so simple yet so elegant. 
Perfectly teamed with lemon buttercream icing and fresh seasonal fruit, come rain or shine, this Lemon and Poppyseed creation is the ultimate British cake.
What's your favourite cake? Let us know in the comments below!
post signature
Share:

Sunday, October 18, 2015

Hello Fresh | Your Weekly Food Shop in a Box

After getting fed up of never having any food in the house, and constantly making last minute trips to the supermarket to get that night's dinner, I decided something needed to be done to fill our fridge in a more organised way that was also kind to our bank balance.

That's where Hello Fresh came in!

I'd met representatives from the company a while back at a Home Show at Islington's Business Design Centre and, as I'd already heard of the brand (through their various promotions and deals circulating the web and outside tube stations), I decided I might actually give it a go and see how it worked/whether it was right for us.


I was also on a bit of a health kick (which didn't last very long, as with most of my attempts and losing weight) so I was looking for quick and easy meals that weren't high in fats, carbs or other nasties that prevent my weight loss. Something that was convenient and didn't require me traipsing round a supermarket trying to find random speciality ingredient. We also got into the habit of making the same 5 meals over and over again, and as nice as they are, the same often gets a bit boring and with us both great food lovers, and enjoy cooking together, we wanted something that could combine all of the above.

Hello Fresh has convenient ready to make recipes on offer every week and make experimenting in the kitchen something of ease. You can choose between a 3 meal or a 5 meal box for couples or families, which contain a selection of recipes with all the ingredients you need in handy pre-measured quantities suitable for the number of diners. Supplied with a recipe card with easy to follow instructions, dinner preparation is so easy!


We went for the 3 meal box as a trial run, as we had prior dinner commitments 2 days that week so it was very handy. This also meant that for a week, we didn't have to dash to the shops or worry about what we'd eat that night. Everything was set out for us in little containers or packets ready to chuck in a pan. Each box contains enough ingredients for exactly 2, 3 or 4 people, depending on your household size and each meal takes around 30 minutes or under to make!

 Luckily, I'd recently been handed a £25 off voucher outside my work, so we got our box better than half price! Considering our weekly shop is typically £50-£70 per week (for two people) with all the added extra ingredients you have to buy for that one experimental meal you want to try and chocolate, sweets, toiletries etc.. £25 or even the full price of the 3 meals for 2 people box at £39.99 and £49.99 for the 5 meal for 2 people box, it's not a bad price, if you take into account all the organic, fresh ingredients that are on offer!

Not only were the ingredients fresh, but they were also organic, free range and hand picked by the butchers and chefs that work for them. The beef fillets we received were beautifully red and everything had a great shelf life, which enabled us to pick and choose which meal we wanted each night. It arrived in a big box which was insulated with wool to ensure the ingredients stayed cold for 12 hours, in case we weren't in when it was delivered (which we weren't!)

Hello Fresh also offer the ability to be flexible with your dinner choices, giving 3-meal box purchasers the chance to swap 2 of their meals for others on their weekly menu. This doesn't however allow for fussy eaters or those who have allergies, as each week you have 5 choices to pick from, meaning if you're allergic to ingredients in 3 of those dishes and you have a 3 meal box, you're going to end up with at least one meal you won't or can't eat! They do also offer the chance to 'pause' your subscription so if a week goes by which offers meals you don't want or like and aren't a fan of the swap options, you can simply pause it and start it up again when you like the recipes. It is quite flexible.

We chose Sicilian Capanata with Herbed Pork and Garlic Ciabatta, Patrick's Tandoori Take-Down with Brown Rice and Sizzling Steak and Chilli Corn Stir Fry with Bok Choy to cook that week. We were super excited! I love cooking and the food just looked so delicious! On the recipe cards was a photo of what it should look like, along with a picture guide as to what ingredients should be used. They also informed you of any allergy information such as being gluten or lactose free, whether they were spicy and how long they took to make.

I must say, the meals tasted incredible! The recipes were easy to follow and didn't take too much time. The ingredients tasted fresh and full of flavour and above all, the meals were healthy! Needless to say, we kept the recipe cards and have since incorporated the meals into our repertoire which we repeat quite often. Our favourite was by far the stir fry, although sadly haven't taken any photos!

My main suggestion for improvement to the service though, would be to do a similar thing to Graze and allow customers to input their dietary requirements as well as their likes and dislikes and tailor a menu specifically to them. Allowing people to say "I don't like fish" or "I'm allergic to that ingredient" would mean they were only offered meals which didn't contain that item. This would however mean that Hello Fresh would have to source items per customer, rather than sourcing for 5 meals in bulk, but would make the ultimate recipe box, tailored to the customer's needs and wants.
For £20 off your first box, use code 2WJ4V8 at https://www.hellofresh.co.uk
Have you tried these recipe boxes before? Do you like to experiment with your cooking? Tell us in the comments below!
post signature
Share:

#BloggersXmas 2015 | 200 Bloggers | 20+ Brands


Plans for this year's (first ever) Big Bloggers Christmas Party dubbed #BloggersXmas is beginning to take shape! With the venue booked and brands lining up, we're hoping this is going to be epic! 

We're hoping this event is going to be one to remember, and hopefully runs smoothly without any hiccups!

There's still plenty of spaces up for grabs!

Tickets (if there are any left) will also be available on the door for the full price of £15. Get them online now for the discounted rate of £10 !

TICKETS HERE!

When is it?: Saturday 5th December 2015
Where will it be?: Finch's Pub, Finsbury Square, London
What time?: 2-5pm
What does it cost?: just £10 online (£15 on the door)
Who's coming?: 200+ bloggers and around 20 amazing brands!
Nearest Tubes: Liverpool Street, Old Street, Moorgate.
Parking: Available opposite.
Age Restrictions: None, but cannot serve you alcohol without valid ID

At the event, you can browse the brands exhibiting, chat to the PRs and build some great networks, as well as make new blogging friends, play games, enter competitions and be festive!

There'll be bauble bobbing, wrapping stations, a selfie booth, twitter and Instragram competitions to win amazing prizes, Brand Match Snap and plenty more activities!

Just a sneak peek at who's involved in this event: Sleek Make up, Benefit Cosmetics, T Plus Drinks and BlanX! More to be announced in due course! (we like to tease!)

The #BloggersXmas is the first of what we hope will be an annual event held in London around Christmas time, to provide a friendly environment for like-minded bloggers to get together and meet fabulous brands. Not forgetting, you all will leave with a goody bag full of fabulous treats for you to try and review!

We've got some amazing brands lined up and we can't wait to share them with you all! Follow us on twitter as well as the #bloggersxmas hashtag to find out which brands will be involved! 

If you're a brand (Fashion, beauty, lifestyle, travel or food) and want to get your products in front of all these bloggers, email me at events@soeursdeluxe.com for more information about how you can get involved! We have limited exhibitor spaces left!

Here's some updates.

Are you coming to #bloggersxmas? Let others know in the comments below!

post signature

Please note, there may be a booking fee applied at the checkout through eventbrite
Share:

Thursday, October 15, 2015

Winter Bouquet* | Next Day Flowers | Prestige Flowers

Nothing puts a girl in a better mood than receiving flowers straight to her doorstep! With Prestige Flowers, this is more than possible! If you're wanting to treat your other half or even just treat yourself, you can get a freshly cut, hand-picked and selected bouquet sent straight to your door the very next day!
Gabriela from Prestige Flowers was lovely enough to send me this amazingly beaut arrangement with a perfectly fitting Winter/Christmas theme. Full of White Roses, silver glittery Pine Cones, Lillies, Curly Willow, Carnations, and Brassica - a very unusual, but very striking addition to this wintery treat.


Next day flowers are ideal for hundreds of occasions, whether its a birthday, an anniversary, or just a nice treat, you can find loads of bouquets here, full of vibrant, beautifully arranged and perfectly seasonal floral gifts.

Being recently engaged, I cannot help but look at bouquets and colour themes etc. I cannot think of a more perfect colour scheme than white and silver, like the flowers in bouquet. Super excited to start looking at potential flowers, and bouquets such as this will really help me with my selection process (cue 'bridezilla' comments.. tehe). 

For next day flowers, that come complete with a flower care guide and a little box of chocolates.. which may I add.. are to die for! No sharing there!
What's your favourite flower? Mine's got to be the classic rose! Let me know in the comments below!
post signature
Share:

Monday, October 12, 2015

Hertfordshire Hangout | The Brewery Tap | Ware

The Brewery Bar Ware

After looking for a place that was open on a Sunday evening in the small Hertfordshire town of Ware where I live, my friend and I found The Brewery Tap (formerly known as The Tap Bar) and were really impressed!

Source
Undergoing an amazing transformation, The Brewery Tap looks incredible, and may have just become my new favourite hangout!
Walking in the door I was really surprised as the last time I'd been in there it was called The Tap Bar and that was a few years ago, so it was like walking into a completely different pub!
Source
This Pub/Bar has been given a whole new interior, leaving it looking hip, trendy and beautifully chic.
In the main bar area, the décor brought rustic greys, dark wood and leathers together with contemporary looking copper and silver accents. Combined with very modern, ultra cool lighting fixtures including re-purposed Jim Bean bottles as light bulbs and bare bulbs hanging from the ceiling by bold rustic pipes, the bar is a real mix of rustic warehouse meets contemporary Shoreditch bar and is a really cool place to go for a nice quiet drink/ pub lunch.
Source
My favourite interior piece is the accent strip of wall by the bar which is made up of 1 pence coins, which creates a strangely beautiful mosaic of copper and dark brown. Not going to lie.. I WANT a similar thing in my flat! Possibly an ultra trendy kitchen splash-back with white marble counter tops. I just love the contrast of the copper and modern/chic wood or stone.
The Brewery Tap also offers a cellar bar which is available for private hire, with a wine bottle ceiling and a glass hatch view up to the main bar above, looking down, you can see the bare beam and chic interior of the cellar conversion. Definitely going to look into hiring this space for a Herts Bloggers event at some point! They will also soon be offering Accommodation in their upstairs space.
Source
Sourcing their ales and food from local breweries and farms, you cannot fault their menu! With a selection of pies, craft beers, ciders, ales and lagers, you're spoilt for choice. All locally sourced from areas such as Buntingford and St. Albans, The Brewery Tap is certainly a great place for a casual drink.
Have you ever been to The Brewery Tap? Know of any other pubs/bars worth checking out? Let me know in the comments below!
post signature
Share:

Wednesday, October 07, 2015

Spicy Pork and Rice Recipe | Under 500cals | Hairy Dieters


spicy pork and rice hairy bikers

This is literally one of my favourite recipes. It's a weekly menu regular for my household!  So much so, that I'm actually eating it as I'm typing this!! Yummy!
I bought the Hairy Bikers' book Hairy Dieters Eat for Life (I now have 3 of their books!) when I was on a diet a while ago (they're quite frequent but never last!) as they have so many amazing recipes that are healthy, low in calorie and quick to make! After creating a weekly shopping list of various recipes within the books, this dish seemed to be our meal of choice almost every week. The combination of succulent pork, mixed with the spiciness of the chilli and chorizo, is just so nice on the palette. It's spicy without being unbearable and texture is similar to that of paella.
It's super simple and easy to make, only takes 30 minutes on the hob and is only 395 calories per portion! (serves 4) It probably doesn't look anywhere near as good as it tstes so you'll have to trust me!

We usually cook the full measurements and box up the remaining two portions to have for lunch/ dinner the next day. Making 1 meal stretch further!
So here's what you'll need:

  • 2 tsp olive oil
  • 1 medium onion, sliced into thin wedges
  • 500g pork tenderloin, trimmed and cut into 1cm slices (make sure to get rid of all the fat!)
  • 50g chorizo (mild or spicy) sausage, skinned and cut into 5mm slices
  • 2 garlic cloves, thinly sliced
  • 1 red and 1 orange pepper, deseeded and sliced
  • 100g green beans, trimmed and cut into short lengths
  • 1 tsp ground cumin
  • 1 tsp ground coriander
  • ½ tsp hot chilli powder (I put in 1 tsp)
  • 150g easy-cook long-grain rice
  • 750ml chicken stock, made with 1 stock cube
  • flaked sea salt
  • freshly ground black pepper

  • Method:
  • Heat the oil in a large, non-stick deep frying pan or sauté pan. Fry the onion wedges over a medium-high heat for 3 minutes until they’re softened and lightly browned, stirring regularly.

  • Season the pork with salt and black pepper, then add it to the pan and stir-fry with the onion for 2 minutes until lightly browned. Add the chorizo, garlic, peppers and beans and stir-fry together for 2 minutes more. 

  • Sprinkle with the spices and stir in the rice, then pour over the stock and bring to the boil.

  • Reduce the heat to a simmer and cook for 20 minutes, stirring regularly, until the liquid has been absorbed and the rice and pork are both lovely and tender.


  • See! Easy!

  • Have you tried this recipe before? Do you have any of the Hairy Dieters' Books? Let me know in the comments below!

  • post signature
    Share:

    Tuesday, October 06, 2015

    Chocolate Cake with Vanilla Meringue Frosting | The Hummingbird Bakery Recipe


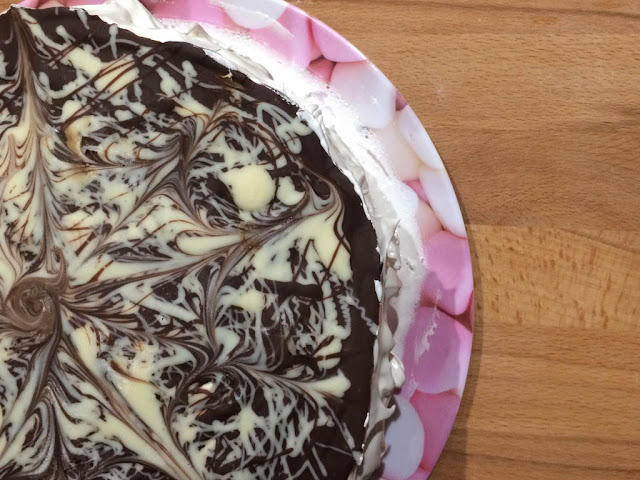
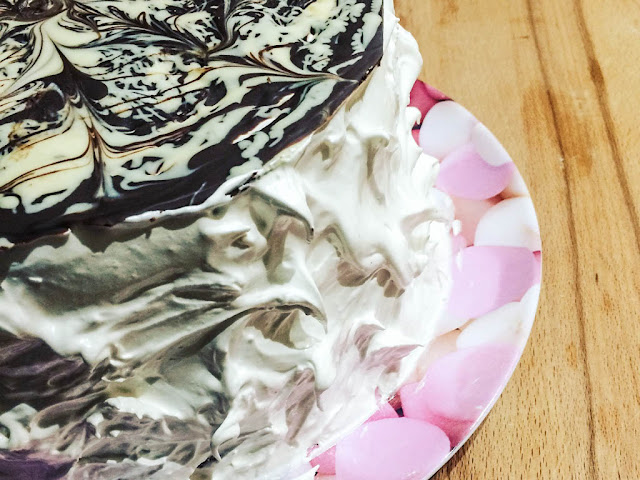
    The Hummingbird Bakery Chocolate Cake with Vanilla Meringue Frosting

    It was our little brother's 17th birthday last weekend, so naturally, I wanted to bake! Knowing his love of chocolate, I knew exactly which book to find a recipe in... One Kirsty had bought me for my Birthday/Christmas (sorry!  I can't remember!). The Hummingbird Bakery's Home Sweet Home.

    A perfect collection of amazing sweets and savouries and of course a selection of incredible chocolate cakes fill this beautifully bound pink baking bible.

    After finding the perfect recipe; Chocolate Cake with Vanilla Meringue Frosting, I went out to buy the ingredients and to collect my brother to help me bake!

    The Hummingbird Bakery Chocolate Cake with Vanilla Meringue Frosting
    The ingredients are as follows:
    Decoration
    60g (2oz) Milk Chocolate
    50g (1 3/4oz) White Chocolate
    Sponge
    170g (6oz) Unsalted Butter, Softened
    350g (12oz) Soft Light Brown Sugar
    3 Large Eggs
    80g (3oz) 70% (min) Dark Chocolate
    225g (8oz) Plain Flour
    1 1/2tsp Bicarbonate of Soda
    1/2tsp Salt
    225g (8oz) Soured Cream
    2tsp Vanilla Extract
    2tbsp Instant Coffee Mixed with 240ml (81/2fl oz) Boiling Water
    (If you don't like coffee, don't worry, I hate it and couldn't taste it at all!)
    Frosting
    300g (10 1/2oz) Caster Sugar
    80g (3oz) Golden Syrup
    120ml (4fl oz) Water
    4 Large Egg Whites
    1/2 tsp Cream of Tartar
    1tsp Vanilla Extract
    The Hummingbird Bakery Chocolate Cake with Vanilla Meringue Frosting
    Method:
    To make the chocolate decoration, melt the milk chocolate and white chocolate separately in two small bowls, either in microwave-safe dishes in the microwave or set over small pans of simmering water.
    Turn one of the cake tins upside down and place a thin piece of plastic or clingfilm over the top of the tin. Place a blob of the melted milk chocolate in the centre and a blob of the white chocolate next to the milk chocolate. Using the back of a spoon, gently spread the chocolate around, marbling the two colours in a round disc that is the same size as the base of the cake tin. (Go crazy with this, we tried a swirly pattern and used a toothpick to create our design). Once done, carefully lift the plastic sheet and set aside on a flat surface for the chocolate to set completely. 
    Preheat the oven to 170C and line the cake tins with baking parchment.
    In a freestanding electric mixer with the paddle attachment or using a hand-held electric whisk, cream the butter and the sugar together until light and fluffy. And the eggs one at a time, scraping down the sides of the bowl and mixing well after each addition.
    Melt the dark chocolate in a microwave-safe bowl in the microwave or in a glass bowl set over a small pan of simmering water. With the mixer or whisk on a slow speed, pour the melted chocolate into the creamed butter and sugar mixture.
    In a medium bowl, sift together the flour, bicarbonate of soda and salt. In a jug, mix together the soured cream, vanilla extract and coffee.
    With the mixer or whisk on a slow speed, add the dry ingredients to the creamed butter and sugar in alternating additions with the coffee mixture. Once everything has been added, scrape down the sides of the bowl and mix well to form a smooth, even batter.
    Divide the batter evenly amongst the three prepared tins. Bake for approximately 20-25 minutes or until the sponge bounces back when lightly touched. Remove from the tins and allow to cool completely before frosting.
    Next, make the meringue frosting. In a medium saucepan, dissolve the sugar and golden syrup in the water. Bring this to the boil. This much boil, without stirring, until the sugar reaches the soft ball stage (a little bit of the syrup dropped into cold water will form a soft ball). If you have one, use a sugar thermometer to check when it is ready - it needs to reach 115C.
    Meanwhile, whisk up the egg whites with the cream of tartar and vanilla extract. This should be whipped up only until it is just beginning to become white and frothy.
    When the syrup is ready, carefully pour it onto the egg whites while the mixer is on medium speed, gradually increasing the speed whilst pouring. Once all the syrup has been added, turn the mixer speed to high and let the meringue whip up. It will become very white and glossy and the bowl will be warm to the touch. Let it continue to mix until the base of the bowl has cooled to lukewarm.
    Once the sponge layers feel cool to the touch, you can assemble and frost the cake. Place the first layer on a plate or cake stand and top with 3-4 tablespoons of meringue frosting. Smooth the frosting out using a palette knife, adding a little more if needed. Sandwich the second layer on top, then add more frosting, followed by the third layer of cake.
    Next frost the sides and top of the cake, covering it completely so that no sponge is showing.
    Carefully peel the plastic off the chocolate disc and place the disc on the top of the cake to finish. If the chocolate disc breaks, break it up further into more pieces and decorate the top of the cake with these.
    post signature


    NB. This recipe was taken out of The Hummingbird Bakery's Home Sweet Home recipe book. Some wording may have been changed to simplify.
    Share:

    Monday, October 05, 2015

    BINKY X Launch | In The Style | Wishlist

    Binky X InTheStyle.com Plunge Neck Drape Dress Check Shirt Dress Faux Suede Over the knee heeled boots

    Made in Chelsea star Alexandra (Binky) Felstead attended her press day today for the launch of her new clothes line BINKY X with InTheStyle.com. Having been to a recording of a MIC special of Virtually Famous a few weeks ago, and following her Instagram account, I already knew about her upcoming line. At the filming she was wearing the most amazing tartan check shirt/dress and knee high boots (both above). I fell in love and knew I had to have them! Searching and searching online, I discovered they were due to be launched this week, so eagerly awaited the announcement!
    The day finally came.. and I forgot about it! Typical me! But I reminded myself today, and unsurprisingly, its sold out already! :( They come in sizes to suit all, from a 6 to a 16! The next dispatch is in late October so make sure you get your orders in! They're also offering 20% off for students too!
    Her collection is full of chic autumn essentials, from floaty frocks, jackets and fringing, you'll be sure to look like you're "Made in Chelsea"! 
    @binkyfelstead tartan check shirt dress inthestyle.com

    @binkyfelstead tartan check shirt dress inthestyle.com
    I LOVE two items in particular; her Red/Navy Check Shirt (£33.99) and her Black Plunge Neck Drape Dress (£34.99). I just love how casual they are but can so easily be dressed up or down! My favourite looks are the Faux Suede Over The Knee Heeled Boots (£44.99) and the floaty plunge dress, and the check shirt dress with Black Suede Ankle Boots (£36.99)!
    I need all of this in my life!
    Have you bought one of these? What do you think of her new line? Let me know in the comments below!
    post signature
    Share:
    Blogger Template Created by pipdig